Create the Virtual Host
- Thứ ba - 07/04/2020 07:13
- In ra
- Đóng cửa sổ này
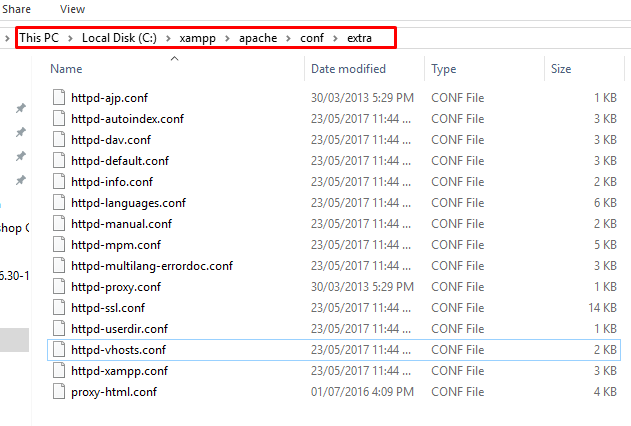
First, you need to navigate to C:/xampp/apache/conf/extra or wherever your XAMPP files are located.
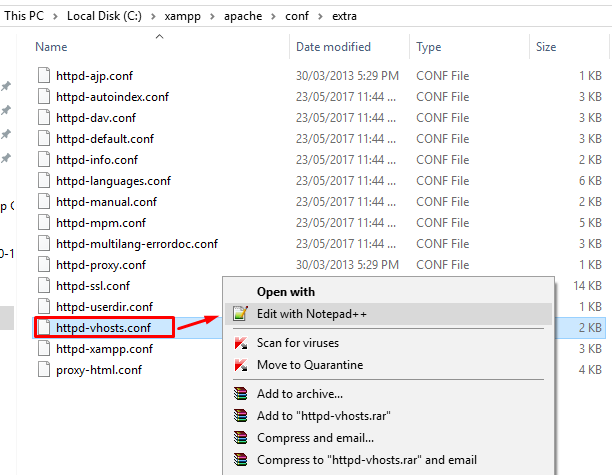
Then, edit httpd-vhosts.conf with any text editor. In my case, I am using Notepad++.
The file looks something like this:
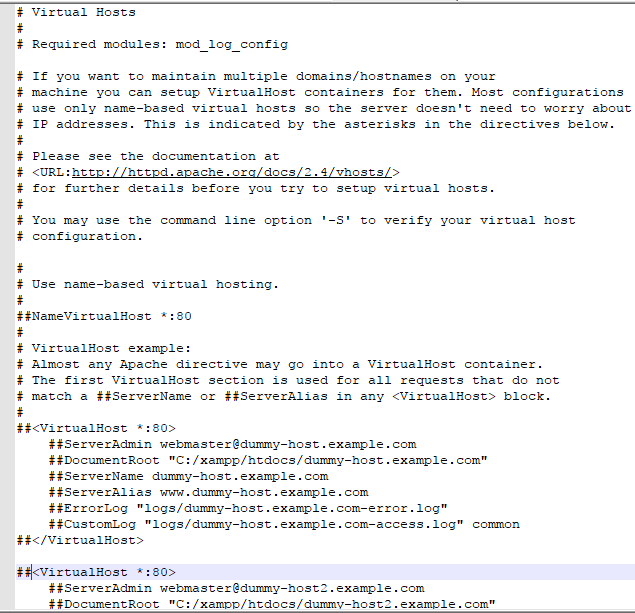
Delete everything in the file and paste the following code:
- <VirtualHost *:80>
- DocumentRoot "c:/xampp/htdocs/WordPress"
- ServerName WordPress.localhost
- <Directory "c:/xampp/htdocs/WordPress">
- </Directory>
- </VirtualHost>
In the above code:
- VirtualHost: Most web servers use port 80 as their default port. However, you can change the port to 8080, 8081, etc.
- DocumentRoot: The folder where files of a site will exist. In our case, the folder name is “WordPress”.
- ServerName: It is the URL for our virtual host.
- Directory: It is the directory of our virtual host.
Now, go to Windows > Search > Run and paste the following line:
- C:\Windows\System32\drivers\etc\hosts
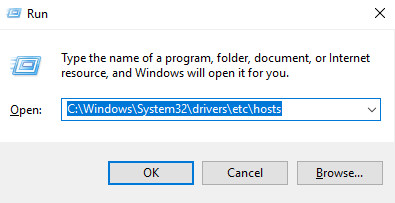
Next, open Host file in your text editor.
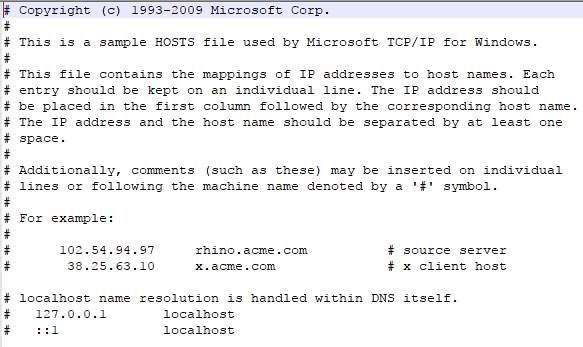
Add the following line in the Host file.
- 127.0.0.1 WordPress.localhost
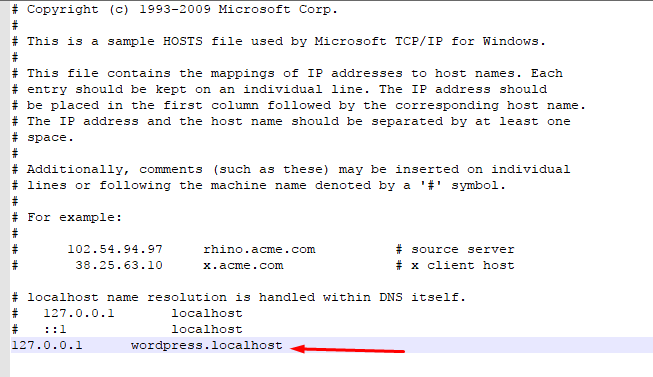
Once you are done, check whether wordpress.localhost opens up in your browser.
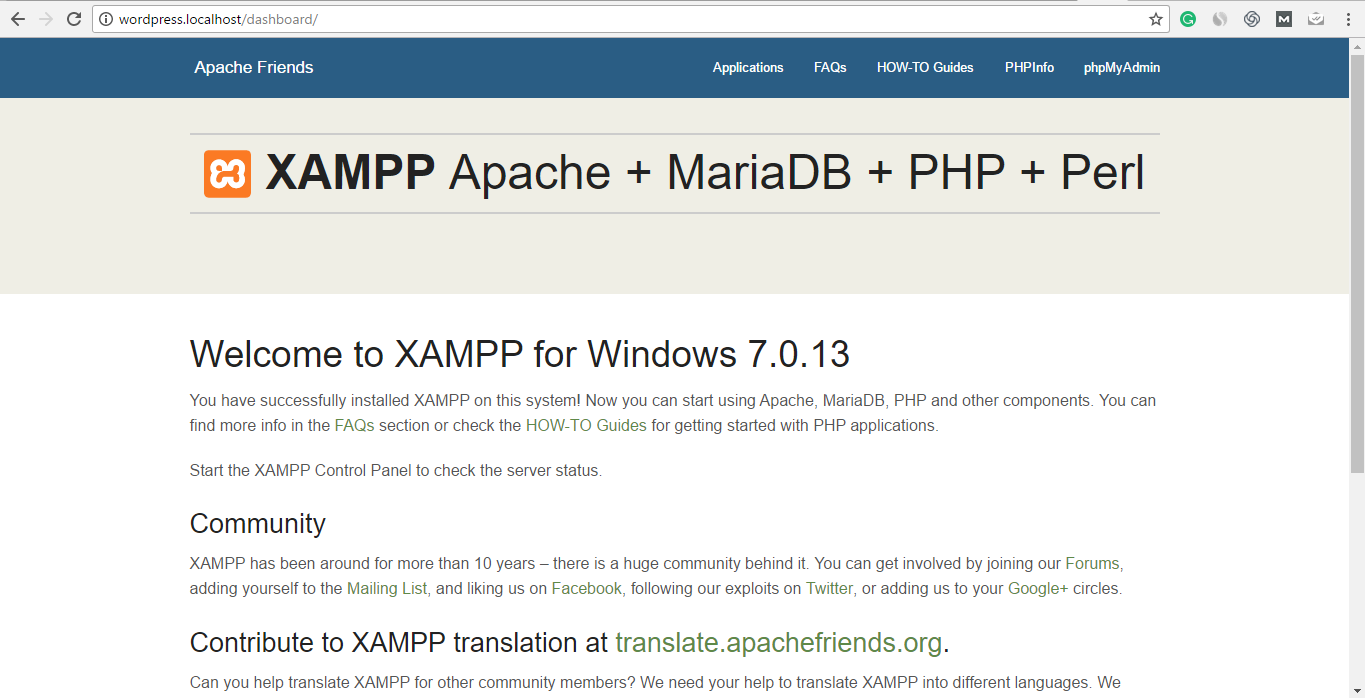
You can see that the domain has been added successfully. You are now free to run the application of your choice in the virtual host. In my case, I will opt for WordPress.
Sau khi tiến hành cài đặt xong các bạn mở <thu_muc_cai_dat_xampp>/apache/conf/httpd.conf
Tìm dòng Include conf/extra/httpd-vhosts.conf nếu thấy có dấu # ở đầu dòng thì xóa bỏ dấu # đi chỉ giữ lại Include conf/extra/httpd-vhosts.conf dòng này chỉ là để load config từ một file khác vào trong file httpd.conf. Với Xampp thì tập tin này được include mặc định. Nhưng mình vẫn muốn nói bước này để nếu các bạn có sử dụng các phần mềm khác để tạo Web Server như là Vertrigo, WAMP,App Server... thì vẫn có thể sử dụng được cấu hình Vhost. Đặc biệt là các bạn cũng có thể cài sử dụng một tập tin với tên khác ( Điều này không quan trọng lắm vì miễn sao các bạn Include được phần cấu hình Vhost vào trong httpd.conf là được.)
Giờ các bạn mở tệp tin<thu_muc_cai_dat_xampp>/apache/conf/extra/httpd-vhosts.conf copy đoạn code bên dưới và paste vào trong file httpd-vhosts.conf.
<VirtualHost *:80>
    ServerAdmin webmaster@yourdomain.com
    DocumentRoot "<đường dẫn thư mục sẽ được gọi tới khi truy cập vào youdomain.com"
    ServerName  youdomain.com
    ErrorLog "logs/yourdomain.com-error.log"
    CustomLog "logs/yourdomain.com-access.log" common
    <Directory "<đường dẫn thư mục">
        Options FollowSymLinks
        AllowOverride All
        DirectoryIndex index.php
        Require all granted
    </Directory>
</VirtualHost>
- <VirtualHost></VirtualHost> Đây là cặp thẻ báo hiệu mở đầu và kết thúc của một khai báo về Vhost. Có một lưu ý nhỏ là nếu bạn nào đổi port của Apache (8080,81,v.v...) thì cũng phải đổi số 80 theo port các bạn chuyển sang nhé.
- ServerAdmin Từ khóa khai báo địa chỉ email của admin (Không bắt buộc).
- DocumentRoot Đây là từ khóa khai báo đường dẫn của thư mục sẽ được gọi khi người dùng truy cập vào domain được cấu hình. Đường dẫn này có thể nằm ở bất kỳ một phân vùng nào.
- ServerName Chính là domain mà bạn muốn đặt.
- ErrorLog Chỉ định đường dẫn của file log khi có lỗi (không bắt buộc)
<thu_muc_cai_dat_xampp>/apache/logslà thư mục chứa file log. -
CustomLog Log lại tất cả các Uri mà người dùng request không bắt buộc)
<thu_muc_cai_dat_xampp>/apache/logslà thư mục chứa file log. -
<Directory></Directory> Đây là cặp thẻ dùng để cấp quyền truy cập cho thư mục nếu thư mục không được cấp quyền sẽ gặp lỗi 403 khi các bạn cố gắng truy cập. Đường dẫn thư mục của bạn có thể là một regular expression. Nếu các bạn không rõ về Regex thì các bạn có thể dùng đường dẫn thư mục giống với khai báo trong
DocumentRoothoặc tham khảo thêm tại: http://httpd.apache.org/docs/2.4/en/mod/core.html#directory -
Options FollowSymLinks Option này cho phép bạn truy cập theo symbolic link (giống như shortcut trong windows vậy). Ngoài ra còn có nhiều các options khác, các bạn có thể tham khảo thêm tại: http://httpd.apache.org/docs/2.4/en/mod/core.html#options
-
AllowOverride All cho phép bạn overwrite các config bằng file htaccess.
-
DirectoryIndex index.php Khi các bạn truy cập vào thư mục ( không chỉ rõ cụ thể là file nào) thì file index.php sẽ được gọi.
-
Require all granted là cho phép tất cả các máy khác được truy cập vào thư mục đang được cấu hình. Chú ý: từ phiên bản 2.2 trở về trước thì Apache sử dụng
Allow from allđể thay thế choRequire all granted
Các bạn khởi động lại Apache bằng cách là khởi động phần mềm XAMPP Control Panel dòng nếu dòng Apache đang running thì các bạn stop và start lại, còn nếu đang ở chế độ tắt rồi thì các bạn chỉ cần start là được.
Ok vậy là bạn đã cấu hình xong về phần của Apache giờ chỉ việc đăng ký DNS cho domain của bạn nữa là mọi việc hoàn tất.
Các bạn mở file %windir%/system32/drivers/etc/hosts bằng notepad hoặc bất kỳ trình editor nào. Thêm vào cuối file và lưu lại. Nếu bạn không lưu được file hosts thì nhớ tắt tình năng readonly và thử chạy lại bằng mode Administrator nhé.
127.0.0.1 yourdomain.com
Khi các bạn gõ địa chỉ yourdomain.com thì máy sẽ ưu tiên tìm địa chỉ IP của domain đó trong file hosts của hệ điều hành trước tiên.
Nếu không có thì nó sẽ đi tìm địa chỉ IP của domain này thông qua các DNS Server trên Internet. Vì bạn đã khai báo trong file hosts nên nó sẽ sử dụng địa chỉ IP được khai báo trong đó luôn. Ở đây địa chỉ IP 127.0.0.1 trỏ về chính máy đang truy cập (chính là máy của bạn - còn nếu cấu hình trên server thì đó chính là bản thân máy server luôn). Bạn có thể sử dụng dài IP từ 127.0.0.1 -> 127.255.225.254 đây là dải IP trỏ về máy của bạn ( Nguyên dải luôn chứ không phải chỉ là 127.0.0.1 nhé ).
Giờ các bạn mở trình duyệt và gõ vào thanh địa chỉ thay thế dòng localhost xấu xí bằng một domain của riêng bạn. http://yourdomain.com yourdomain cũng có thể là tuan.tv, doan-totnghiep.com(chấm local. chấm canh, chấm mắm, hay chấm bất kì thứ gì bạn thích nhé, chỉ cần nhớ là đã khai báo trong ServerName và file host là được).
Tổng kết
Việc sử dụng Virtual Host có vài lợi ích sau.
- Bạn có thể truy cập vào bất kỳ thư mục code nào mà không cần phải copy vào
htdocstrong XAMPP. - Nếu bạn dùng folder code ở một phân vùng khác thì bạn không cần phải lo lắng backup lại folder code mỗi lần cài lại windows.
- Nhìn có vẻ nguy hiểm hơn :v
Các bạn cũng có thể cấu hình Vhost với WAMP, APPServer, USBServer các cấu hình cũng không khác nhiều lắm. Vì tất cả các phần mềm này đều dùng Apache, Mysql và PHP. Vhost là một tình năng của Apache chứ không phải của XAMPP nên phần mềm nào dùng Apache thì đều có thể cấu hình Vhost theo cách tương tự, điểm khác biệt chỉ là khác về nơi đặt file httpd.conf. Chúc các bạn thành công.